Search This Blog

Showing posts with label cheese. Show all posts

Tuesday, March 23, 2010

Southwestern Chicken, Cheese and Corn Skillet

IMG_6463

And easy way to get The Husband to eat something is to either cover it in cheese or encase it in pastry. For this recipe I chose to take the former route. I ended up making this when we had come back from grocery shopping and I needed to get lunch on the table quickly. The ingredients are pretty basic and most people have them on hand. Start to finish this takes roughly 25 minutes with all the prep time included.

IMG_6438

To start off I made the coating for the chicken. In the bowl there is cumin, chili pepper, salt, pepper and flour.

IMG_6439

Chicken breast pieces from the grocery store.

IMG_6440

While you could skip the step of rolling the chicken in flour before pan frying it, it gives it a nice texture and added taste.

IMG_6442

I added a little bit of oil to the pan and coooked the chicken on both sides until it was browned and cooked through.

IMG_6443

For me anything Tex-Mex or Southwestern pretty much demands diced green onions.

IMG_6444

A few minutes before the chicken was done I added the green onions. Chopped poblanos would be good in this as well.

IMG_6451

Since I was using frozen corn and I didn’t want my chicken to dry out I removed it from the pan and put it to the side.

IMG_6446

The corn went into the pan.

IMG_6449

I added in one chopped red chili. If The Husband wasn’t eating this as well I would have added more but he’s a wuss when it comes to eating hot food. I’m slowly working on increasing his heat tolerance by sneaking chilies into food.

IMG_6450

I love how quickly frozen corn thaws. It has made my life easier on more than one occasion.

IMG_6452

Once the corn was heated through and there was no significant amount of water left in the pan I added in a generous splash of lime juice.

IMG_6454

I dumped the chicken back in, gave everything a stir and added a generous amount of cheddar on top. This would also work really well with Monterey jack or pepper jack cheese. Once the cheese had melted it was done.

IMG_6462

This was really good, except I added too much cheese. When I told the husband this he said that there is no such thing as too much cheese. Spoken like a true guy. I served it with a side of cornbread but you could put it in a tortilla or with a side of Mexican rice.

del.icio.us Tags: ,,

Wednesday, March 3, 2010

Fried Mozzarella Sticks

IMG_5810

While I love the finer things in life I am also an ardent fan of pub food. One of the things The Husband and I love are fried mozzarella sticks and I can confidently say that if you haven’t had one, you haven’t lived. They’re ridiculously easy to make and are an integral part of any sports related junk food menu.

IMG_5739 

First of all, obviously, a block mozzarella cut in finger width pieces. You could use cheddar but mozzarella is the standard for this recipe.

IMG_5742

Next you set up your breading line: flour, eggs and bread crumbs.

IMG_5745

For this recipe I actually used corn flake crumbs. Usually I am not the biggest fan because they have the faintest sweet flavour but they’re perfect for this since when fried they turn extra crispy. I also added dried parsley, salt, pepper, garlic powder, onion powder and paprika.

IMG_5752

After breading the sticks I put them in the freezer for half an hour. You cannot skip this step or else you will end up with a puddle of melted cheese when you try to fry them. If you leave them in a little longer and they start to freeze you will still be ok.

IMG_5807

I put in half an inch of oil in a pan and quickly fried my mozzarella sticks. They really do not take very long, 30 second tops per side. You have to watch them carefully so they neither melt nor burn.

IMG_5812IMG_5827

Usually I make marinara sauce with this but this time we just ate them with chili sauce. These are rich, they are of course, solid cheese and even I can’t eat more than a couple at a time. The Husband, happily inhaled quite a few of these while watching the Superbowl. They are so good, crispy on the outside and gooey and melty on the inside. Best eaten hot soon after they come out of the pan.

Saturday, February 13, 2010

Superbowl Cheese Dip

IMG_5757

This isn’t calorie or waist friendly and isn’t very pretty but boy is it tasty. I’ve always thought that the reason that non-football loving people like to watch the Superbowl is that it makes an excellent excuse to spend an entire afternoon eating greasy food. At The Husband’s request I made this dip for Superbowl Sunday and we both happily gobbled it up while watching the game.

IMG_5718

The ingredients: Cheddar cheese

IMG_5721

Mayo. Not the travesty that is Miracle Whip.

IMG_5722

Softened cream cheese. Notice how I used light cream cheese and light mayo? Every little bit helps, people!

IMG_5724

The cheese, mayo and cream cheese (I used more or less the same amount of each) went into an ovenproof pan along with chopped green onions, English mustard, cayenne pepper, salt, pepper and Worcestershire sauce. Hot dips are pretty forgiving in terms of the proportions between the cheeses and the mayo. You really can just eyeball everything and not screw up.

IMG_5730

After mixing everything together I smoothed it out and put it into the oven at 350 Celsius.

IMG_5736

I checked on it after 15 minutes but decided to put it back so it would be more bubbly.

IMG_5748

After 25 minutes it was perfect. This picture is courtesy of the husband since I was cooking something else at the time so he was the one who actually took it out of the oven. He has a thing with overhead shots for some reason but is a sweetheart for getting dragged over often to take pictures of food.

IMG_5759 

Tortilla chips are pretty much a prerequisite for eating this. This is cheesy, hot and savoury and is perfect party food. I really need to find an excuse to make this again soon!

del.icio.us Tags:

Wednesday, January 20, 2010

Chicken, Cheese and Bean Quesadillas

IMG_5042IMG_5053

This my friends, is cooking for dummies. To paraphrase those Geico commercials, “so easy a caveman can do it”. I hold a soft spot for Tex-Mex food; it tends to be fast, easy and oh so delicious. And it has a lot of cheese in it, which is always a plus. This recipe is very easy to whip up on a weeknight after work and you can easily vary the fillings to suit everyone in your family. Tex-Mex Quesadillas at their most basic are a Mexican grilled cheese sandwich, with tortillas instead of bread. Here is my rendition.

IMG_5028

I love beans. My family is Latin American so I grew up eating them. Eating them reminds me of my mother’s cooking. I do take a shortcut when making Tex-Mex and use canned refried beans. Please don’t think too badly of me.

I start off by smearing beans directly on a tortilla since it helps to hold everything together.

IMG_5029

Next up is the cheese. I have a super difficult time finding Mexican cheese at my supermarket and by difficult I mean they don’t carry any so I always get mixed pre-shredded Taco/Nacho cheese.

IMG_5032

As you can see, I don’t skimp on the amount I add.

IMG_5033

Next up is the chicken. If you want a vegetarian quesadilla leave it out. In this case I cooked chicken thighs specifically for this recipe but if you have leftover roasted chicken this is a great way to use it up.

IMG_5034

I know this will seem very weird but I add Frank’s Red Hot sauce to my chicken. If you want to be more traditional add salsa instead but try Red Hot at least once, trust me, it is really good.

IMG_5036 

I add a liberal amount of sauce to my chicken. Red Hot is not very hot at all so don’t be scared.

IMG_5037

The chicken goes on top of the cheese.

IMG_5038

I like red onions so I thinly sliced some and added them along with more cheese. The quesadilla doesn’t cook for a super long time so your onions will still be half raw. If this bothers you either pre-cook them or omit them.

IMG_5039

I actually use a crepe pan to cook my quesadillas. The sides are very low which makes it easier to flip them upside down.

IMG_5040

I generally cook them on medium heat and when I see that the cheese on top is melting I put a tortilla on top, press down a bit and then put plate on top of the pan, flip it over and then slide the tortilla back again onto the pan.

IMG_5041

Mmmm…. cheesy.

IMG_5049

Let’s look inside: everything is heated through and the chees has all melted.

IMG_5057IMG_5053

I of course, added a scoop of guacamole on the side. Although I am willing to slave for hours over a hot stove to please my stomach, sometimes the tastiest things are happily, quite easy to make. This was a very satisfying dinner and each tortilla is enough for 2-4 meals depending on appetites and what you put in the middle. Do try this recipe out, it is really a go-to recipe when you don’t have a lot of time but you still want something that tastes great.

Thursday, January 7, 2010

Perogies

IMG_4691

Before last weekend I had eaten perogies only once. They came pre-prepared, frozen and they tasted like starchy little hockey pucks. Since that regrettable experience I have been meaning to try my hand at making them from scratch. You can find the recipe I used here but there are a ton of different recipes on the internet.

IMG_4667IMG_4668

The dough was very straightforward: eggs, flour, salt, water and olive oil. I’m used to making dough with butter so using olive oil instead was a change.

IMG_4669

The dough was super stiff even after kneading it for a while. I could have probably thrown it at someone and given them a concussion. Not that I would ever lob dough at anyone.

IMG_4670IMG_4672

Sautéed onions are the traditional accompaniment but I decided to use French shallots since they had been kicking around the pantry for a while.

IMG_4673

This is a terribly unflattering photo of my mashed potatoes/cheese mixture. The original recipe calls for cottage cheese but I decided to use a mixture of marbled cheddar and aged cheddar in the filling. I like this combination since you get the melty texture of the marbled cheese but the stronger taste of the aged cheddar.

IMG_4674

Even though my dough was very stiff after resting in the fridge for half an hour it was quite easy to roll out. I cut the circles out with the smallest biscuit cutter I have.

IMG_4675IMG_4679IMG_4677IMG_4681

Filling the perogies was a little messy but I managed to do it without having too much of the filling ooze out.

IMG_4684

Once my water was at a galloping boil I dumped my perogies in.

IMG_4686

They started bobbing up on the surface when they were ready. Unfortunately at this point a couple of the perogies broke open, I guess I hadn’t sealed them properly.

IMG_4687

After they were done I sautéed them in butter in the same pan in which I had cooked my shallots. I should have done this in two batches since the pan was rather crowded but I was rather hungry at this point.

IMG_4690IMG_4688

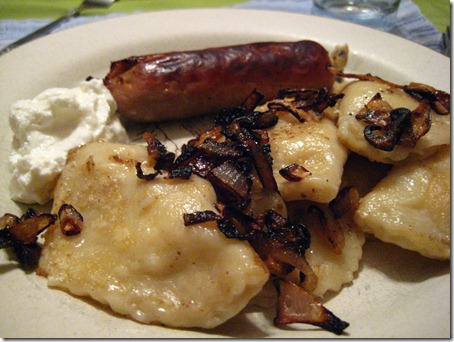
I served my perogies with Toulouse sausages which I had cooked in the oven, Greek yogurt in place of sour cream and the sautéed shallots scattered on top. It always amazes me how sometimes the simplest recipes can be so good. As you can see from my blog I am a big fan of the classics rather than more exotic fusion foods and I am really glad that I tried this recipe. I’m thinking about buying some Eastern European cookbooks this year and seeing what else that cuisine has to offer. Anyone have any recommendations?

Technorati Tags: ,,
Blog Widget by LinkWithin