Search This Blog

Sunday, August 30, 2009

18th Century Market, Cupcakes and Paninis


This past weekend a friend I work with, Alexandra, and I went to Old Montreal to the 18th Century Market. No, I have not mastered the science of time travel (yet), but rather it's an event that the museum down there does every year. They try to recreate the feel of a public market as it would have been in the 1750s. There are people walking along in costume: soldiers, priests, townspeople etc and even the merchants at the stalls are dressed up. The "merchants" are actually food producers from the Montreal region who sell artisanal cheese, bread, chocolate, jams etc.. The whole event is really well planned and there is a lot of attention to detail. As Old Montreal still retains most of its originals buildings and cobble stoned street it almost feels as though you have been transported back in time.


This stall was selling products made with garlic flowers. It could also keep vampires away if one is so inclined.

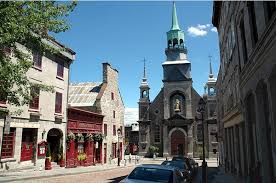
A shot of the general area.


This stall was selling earthenware pottery.

These are fresh picked wild raspberries, strawberries and blueberries. They were also selling chocolate covered blueberries which I ate before I took a picture. Oops! They were nice and juicy though.

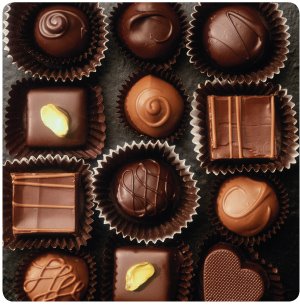
A stall selling handmade truffles. I think we made a beeline for them once we saw them.

Here are some shots of the general area and the actors walking around. There were also musicians performing folk songs.


While we were there they did a little military parade and fired their guns which was pretty neat.

I ended up buying rhubarb-strawberry jam, honey-caramel spread, honey-chocolate spread, maple sugar and maple butter. Yum.

After we had finished with the fair we went Olive and Gourmando which is a very cute bakery/cafe. It was absolutely packed and we had to wait for a bit but it was totally worth it.


They have several hot plates and hot and cold sandwiches. Alexandra advised me to get the hot Cuban sandwich, as she said it was amazing.


She was so right. It was hot and cheesy and so good. Their version is made with ham, braised pork, home-made mayonaisse (chipotle, pickles, lime and coriander) and gruyere cheese. I enjoyed every bite.

I also had a glass of their home made lemon and honey iced black tea.


Here are two shots of the tiers and tiers of pastries that they have:


The only thing I don't love about this place is the opening hours. They're only opened 8am to 6pm Tuesdays to Saturdays so it will be a while until I go back since they're far away from work.

Although the pastries looked great we decided to hit a nearby cupcake shop called Les Glaceurs for dessert.


The cupcakes looked almost too pretty to eat. In the end Alexandra chose a vanilla cupcakes and I took a red velvet one.


The flower decoration on the vanilla cupcakes was just too cute.


The Red Velvet didn't look too shabby either.

Unfortunately they looked better than they tasted. They weren't bad but the cupcake part was a little dry and dense; I like them fluffier. There was also very little chocolate flavour in mine. But given that I have a hard time saying no to sugar I still finished the whole thing. I've read reviews on the internet and they are generally positive so I think we might have just caught them on a bad day.

This was only the first part of my fun but long and tiring Saturday. After that I went on a sugar crawl of Montreal along with a meetup group. Part II will be on my next post.

Patacones (a.k.a. Tostones, a.k.a. Fried Plantains)


At work a few months ago they started stocking plantain chips in the vending machine. Very quickly they became popular and they were always out of stock. Then they stopped carrying them and instead put something healthy, oven baked and completely tasteless in their place casting many people into mourning. It had been a while since I had had some so when we went to a different supermarket than our usual one and I happily saw that they had plantains I bought two and decided to make Patacones.

Patacones are like plantain chips but thicker and can be eaten as an appetitzer or side dish. They're easy but good.

I peeled my plantains and cut them into one inch pieces.

For deep frying I like using one of my Le Creuset pots since it keeps the temperature even and the sides are high. I always contemplate getting a deep fryer and start having visions of making chicken wings and doughnuts (not together of course) but then I pull myself back from that caloric abyss.


Here is my first batch.


Then they get flipped after a few minutes.


Patacones
need to be fried twice (healthy isn't it?). After the first frying the slices get pressed down (I use a heavy glass), to make them thinner and then fried again for a few minutes more on each side.


After they are nice and golden I drain them on paper towel and sprinkle them with salt.


Patacones are like chips, you can't eat just one. I like to have them with guacamole and fresh tomato salsa. Then contrast between the crispy, salty Patacones and the cool, smooth guacamole along with the fiery salsa tastes like heaven. They also keep surprisingly well. To reheat I put them in the oven at 350 Fahrenheit for 10 minutes and they taste like as though they just came out of the fryer.

Friday, August 28, 2009

Enchiladas


Today we are going south of the border. Ole! (South of the American border rather, not the Canadian border). Mexican/Tex-Mex is rather scarce here in Montreal, let me put it this way, there isn't even a Taco Bell here and you probably couldn't find 5 people within a 5 mile radius of my house who can properly pronounce the word "jalapeno". Given this dearth, I've started to make my own Tex-Mex at home.

Recently my supermarket has expanded its "ethnic" aisle beyond Asian food and has gotten a Latin American section. When they started selling enchilada sauce I almost did a happy dance of joy in the middle of the grocery and ran home to make my version of enchiladas.

The partial cast of characters:

-Cheese and lots of it.

-Enchilada sauce. In a fit of inspiration I decided to buy one each of the green and the red version. You will rarely see me using pre-prepared sauces but since I don't have access to all the chiles I would need to make them from scratch I make exceptions.

-Cooked chicken strips.

The chicken gets mixed with:

-Spinach (yes, might seem a bit weird but tastes good in this recipe)
-Green onions
-Sour cream (don't use low-fat because it makes the filling watery)
-Salt and pepper
-A tablespoon of salsa. I had five chile salsa in the fridge.
-About half of the grated cheese which I added after I took this picture.
-Chicken.

This all gets mixed up until everything is incorporated. I always end up using more sour cream than I think I will need; it helps bind the filling.

I use flour tortillas to make enchiladas. They don't sell corn tortillas here and I don't have a tortilla press to make them. Above is the pan with the filled, rolled tortillas doused with the two enchilada sauces and covered with the rest of the cheese. This goes in the oven for 45 minutes at 400 Fahrenheit. It doesn't technically need to cook this long since the chicken is already cooked but when you leave it longer the texture vastly improves. The flavours have time to marry and the cheese becomes bubbly and the edges get nice and crispy.

With this I always make red rice which is dead easy. I just cook my rice as normal but replace half of the water with chicken broth and the other half with pureed tomatoes. I then add ancho powder, garlic powder, onion powder, cumin, coriander, salt and pepper. The picky Husband doesn't like bits of onion in his rice *sigh*, hence why I used onion powder instead of actual onions, ditto for the garlic.

These are my enchiladas after 45 minutes in the oven. Check out the blanket of bubbling cheese.

My final dinner plate. I had some guacamole and fresh salsa in the fridge and had made patacones (a.k.a. fried plantains) so I served them with my enchiladas. I don't live anywhere close to an authentic Tex-Mex/Mexican food restaurant so my home made version is 100 times better than anything I can find here. It makes a ton of leftovers which warm up really well so you get a lot of meals for your efforts. I really should write my supermarket a letter thanking them for carrying enchilada sauce and threatening a picket line if they ever stop.

Tuesday, August 25, 2009

Bangers and Mash


I absolutely love anything British and love trying out classic English recipes for fun. My latest experiment was with the prototypical pub food, Bangers and Mash (a.k.a. sausage, gravy and mashed potatoes). I remember reading years ago that Kate Winslet had Bangers and Mash at her wedding reception and if it's good enough for Kate, it's good enough for me; I have wanted to try them ever since then.

This is another ridiculously easy recipe. I began by putting a bit of oil into my trusty Le Creuset pan, putting the sausages on top and throwing the whole thing in the oven at 400 Fahrenheit for half an hour or so. As there are no British sausages to be found where I live I used Toulouse sausages. These are my favourite kind but they are not always available.


After half an hour when they were nice and golden I flipped them and put them in for another 15 minutes. I know it seems like a long cooking time for sausages but they were quite thick and The Husband likes the outside to be crispy and well browned. As you can maybe make out, enough fat was rendered during the process to make a cardiologist weep in frustration, but those are the excellent makings of pan drippings for gravy.

I've never understood why people buy gravy in a can or as powder in a pouch. It seriously is one of the easiest things to make. After the first time that I made it my reaction was, "that's all??". It was a bit like that scened in the Wizard of Oz when Toto pulls back the curtain and they see that the Wizard of Oz is just some guy with a microphone, it looks complicated but the explanation is rather simple. Here is how I make gravy:

Take the fat and the pan drippings (don't drain it no matter what the health magazines might say because that would be throwing away flavour), and add some chopped shallots/onions/mushrooms. When your additions are cooked add a few tablespoons of flour. Add a bit more or a bit less depending on how much fat you have. Let that brown for a minutes or so and dump in some wine or whatever other hard liquor you want to use and some chicken/beef broth. Crank up the heat to a mad boil and whisk away. After a few minutes it will have thickened. Add salt and pepper as needed and any herbs you might wish to use.

That's the basic formula for gravy. I know there are recipes that start with deglazing the pan with wine but I find that adding the flour to the fat first and then the wine is more foolproof in terms of avoiding lumps. The method above works with any kind of meat and the flavour can be modified easily with different herbs etc.

Here is my gravy at a fevered boil after I had added some pepper.

Here is a "banger" resting comfortably on a pillowy bed of "mash" draped with a layer of savoury gravy. The Husband heartily approved of this dish. This is one of those guy food recipes. Potatoes, meat and gravy are always an instant winner with anyone of the male persuasion. The only thing missing from this was a pint of ale.

Rocky Road Bars


The following Rocky Road Bar recipe is quite possibly the best thing ever. It has rocked my chocolate loving world. I am fully capable of rhapsodizing for hours about how good this but I have to first tell you all about the genesis of this creation.

It began with The Husband telling me that I needed to hurry up and eat my All-Bran flakes since they were probably getting stale. Since I had bought the box during one of my more healthy moments and I generally don't like cold cereal (paradoxically enough), I wanted to find a way to use them up in a recipe. Thus my version of this Rocky Road bars was born.

First of all I made dried strawberries and dried blueberries. I don't have a dehydrator but I dry fruit using the oven. It will take a while though. You spread the fruit out on a tray and leave it on the lowest possible heat for a few hours. I have always used any dried fruit that I have made this way in a recipe so I am not sure if it would keep in a cupboard though.

Now for the chocolate. This wonderful bowl of velvety goodness is a package of semi-sweet chocolate, a package of white chocolate and some milk chocolate chips all melted together in the microwave.

To this I added:

-1 cup or so of All-Bran flakes (for nutritional value and because they were the excuse for making this in the first place)
-1.5 cups of mini marshmallows
-1 cup or some of mixed dried apricots and raisins
-The dried blueberries and cherries that I had make
-I bought one of those bags of mixed mini chocolate bars and added the smarties (like M&Ms to you non-Canadians), coffee crisps and the Kit Kats.


I mushed the whole thing down in a pan and sprinkled chocolate jimmies on top.

The finished result. As Keats said, "a thing of beauty is a joy forever". How about another picture?

And just one more.

Dried fruit + crunchy cereal + chewy marshmallows + candy bars + chocolate + sprinkles = instant winner. To paraphrase Winston it's chewiness wrapped up in crunchiness inside chocolatyness (yes, I know that's not a real word). This was quite possibly the best excuse ever to use up cereal. If you are a choco/sugar freak this will totally satisfy your cravings.
Blog Widget by LinkWithin